PickingPal for WooCommerce is an order picking and fulfillment accuracy app that helps you ship orders faster & eliminate shipping mistakes. Reduce returns, and save on Customer Service calls too!
PickingPal helps you achieve 100% order picking & shipping accuracy through the use of barcode scanning. Never send out an incomplete order or the wrong items to your Customers ever again!
Scan your order barcode, scan your items, and let PickingPal do the rest!
No scanner or barcodes? Please see our FAQ page for more information, or feel free to drop us a line!
PickingPal includes several document types to facilitate the picking process:
You can use the default PickingPal documents, or create and style your own.
Create your own custom Pick Ticket, Pick List, or Packing Slip by following these steps:
/woocommerce-pickingpal-template/ folder from the /woocommerce-pickingpal/ or /woocommerce-pickingpal-pro/ plugin directory to your /wp-content/themes/{your-active-theme}/woocommerce/ directory/woocommerce/ folder first within that theme folderOnce you’ve followed the above steps to create the correct folder structure as described, in order to edit the layout or content of the different documents, you have to open the corresponding PHP file (see below) in any editor that can open a .PHP file (like notepad) and then make the necessary changes to that file. If you want to make styling changes, you’ll update the ‘template.css’. This generally requires someone with HTML/PHP/JS/CSS skills.
So, for example, if you want to update the Pick Ticket, you would open template_print_pick_ticket.php and make the necessary edits. Repeat the process for each template you would like to customize.
We do not provide instructions on how to code HTML/PHP/JS/CSS as part of the PickingPal license purchase.
If you run into any trouble with the Custom Template(s), simply remove the /woocommerce-pickingpal-template/ folder.
This will reset the system to use the default PickingPal document templates.
An individual with a WordPress Admin access role will have access to all 5 PickingPal tabs.
Note: The far right tab will be labeled as Upgrade in PickingPal Lite or PickingPal. On PickingPal Pro, the tab is labeled License.

An individual with a WordPress Shop Manager access role will have access to only 3 PickingPal tabs.
The Settings & License/Upgrade tabs are not visible to Shop Managers. This prevents unnecessary access to the PickingPal configuration screens that should only be accessed by WordPress admins.

Visit Settings > Pick Ticket
PickingPal comes with a configurable Pick Ticket Template. To configure what is shown on the Pick Ticket:


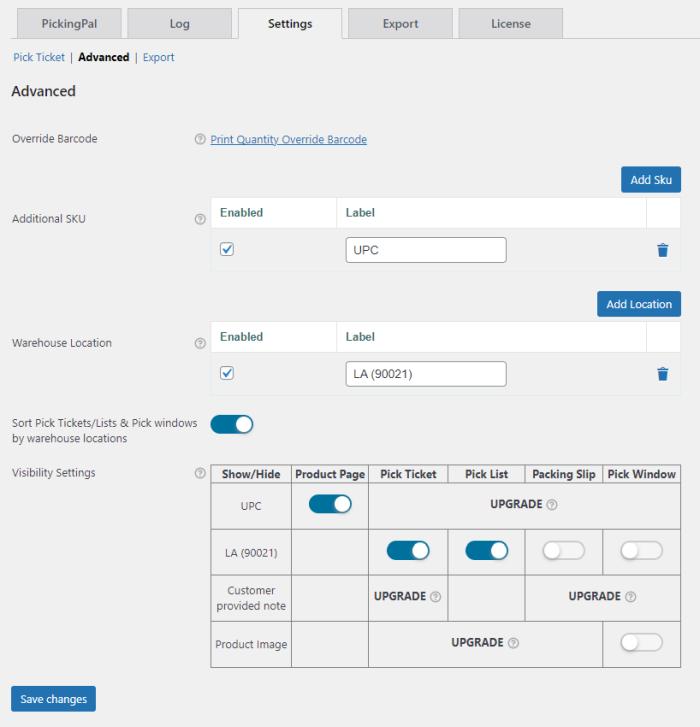
Visit Settings > Advanced
The Advanced screen shows the following features:
In addition to the core features available in PickingPal, these are additional features that come with PickingPal Pro.

For stores that ship large multiples of the same item, where the item quantity is pre-sorted and counted, the Quantity Override barcode may be used to avoid having to scan the item many times.
This is especially helpful when a shipper has to scan over 20 of the same item.
To print the barcode, visit the PickingPal > Settings tab, click Advanced and use the Print Quantity Override barcode link.

See below for information on how to use the Quantity Override barcode feature.
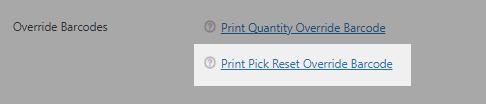
Some stores may have use-cases where they would like to reset the picking status of an order without using a keyboard or mouse. This feature allows the picking status of an order to be reset by scanning a special pre-defined barcode.

To print the barcode, visit the PickingPal > Settings tab, click Advanced and use the Print Pick Reset Override barcode link.
See below for information on how to use the Pick Reset Override barcode feature.
For stores that would like to utilize more than one SKU per product/variation for scanning / picking purposes, PickingPal has an Additional SKU feature.
For example, a store may resell an electronics device that comes from the original manufacturer with the manufacturer’s UPC barcode label on it. The store selling that item may want to create their own internal SKU for that item, but utilize the manufacturer’s barcode label for scanning purposes.
In these situations, a store may use their internal SKU in the native WooCommerce Inventory > SKU field and may place the value of the manufacturer’s barcode label in the native WooCommerce Inventory > GTIN, UPC, EAN, or ISBN field.
However, if the store needs additional barcode value fields for picking / scanning purposes, PickingPal has implemented an Additional SKU field for this purpose.
Once enabled, for each product in your catalog, you can define an additional SKU for scanning purposes. In the screenshot below, we have shown the creation of a “UPC” Additional SKU.
Once defined, we can now input a UPC value for every product (including products with variations) that correlates to the value printed on the manufacturer’s barcode label.
At shipping time, as long as your physical product has a barcode equivalent to the UPC (or whatever number barcode is on the product), you can scan that barcode for picking verification on an order in place of the SKU.

Fields:
After creating and enabling an Additional SKU in PickingPal > Settings, you may then assign a value to that field in each Product.

In the example above, we have assigned the value of 12345-M to the UPC Additional SKU field.
A warehouse location feature is available to allow store owners to assign one or more physical warehouse locations to a product.
For example, in a row of 20 storage racks, each rack having 5 shelves, and each shelve providing room for 4 cartons, there would be 400 possible stock locations to store goods.
Instead of guessing where inventory is stored, a warehouse can assign a name or identifier to each of the 400 locations, and store the exact location of that product inside the Product record of WooCommerce.
In the above example, we could define a location such as R1S4P2 to signify Rack 1, Shelf 4, Position 2, and store R1S4P2 inside the Product record of WooCommerce, and allow that value to be displayed on the PickingPal Pick Ticket or Pick List.

Fields
After creating and enabling a warehouse in PickingPal > Settings, you may then assign a warehouse location to a Product.

In the example above, we have assigned location B7 to the LA (90021) warehouse location.
When the Pick Ticket or Pick List is printed out, the warehouse location will either be shown or hidden, depending on the Show/Hide setting defined.

When enabled, this feature will sort the Pick Ticket & Pick Lists in alphabetical order, based on the warehouse location.
This is helpful when a warehouse is organized in a sequential manner, and thus helps improve the picking speed and efficiency of the shipping staff.
This feature controls the visibility of the specified order or product values.
| Value | Location* |
|---|---|
| Product Page | Front-end website product page. Displays under/near the native SKU value |
| Pick Ticket | Displays on the PickingPal Pick Ticket |
| Pick List | Displays on the PickingPal Pick List |
| Packing Slip | Displays on the PickingPal Packing |
| Pick Window | Displays in the PickingPal Pick Window |
PickingPal has the following visibility settings:
| Show/Hide | Visibility Location(s) |
|---|---|
| Additional SKU(s) | Product Page |
| Warehouse Location(s) | Pick Ticket, Pick List, Packing Slip, Pick Window |
| Product Image (thumbnail) | Pick Window |
PickingPal Pro has the following visibility settings:
| Show/Hide | Visibility Location(s) |
|---|---|
| Additional SKU(s) | Product Page, Pick Ticket, Pick List, Packing Slip, Pick Window |
| Warehouse Location(s) | Pick Ticket, Pick List, Packing Slip, Pick Window |
| Customer Provide Note | Pick Ticket, Pick List, Packing Slip, Pick Window |
| Product Image (thumbnail) | Pick Ticket, Pick List, Packing Slip, Pick Window |
Note: If multiple Additional SKUs or Warehouse Locations have been defined, they will show up as separate rows in the Visibility Setting table.
See the section below titled Order Loaded for information about the main PickingPal pick window.
When enabled, this feature will automatically pick any products on an order that is configured as a digital product.
Some orders may contain a mixture of a physical & digital products. Since a digital product (like an eBook or software download) is virtual, it cannot have a physical barcode. As such, PickingPal can auto-pick these products, to allow an order to reach 100% pick complete without having to manually scan a barcode for digital products.
Pick-to-bin is an advanced feature for warehouses that using multi-bin picking carts.
In simple terms, pick-to-bin is a specific type of picking process, where a special type of pick list is generated that correlates to how many bins there may be in a pick cart.
Let’s say one of your picking staff has a pick cart with 10 bins (to pick 10 orders at a time). PickingPal can be configured to print a special pick-to-bin pick list for 10 orders, and be organized/categorized by product and pick-cart bin, instead of product alone. The pick-to-bin pick list will show how many items to pick of each item, and which pick-cart bin they are associated to.
For example, if order #1, order #5, and order #9 have quantity (1) of the same item (item A), the pick-to-bin pick list will show the information similar to this:
Item A – QTY 3
(1) Order Bin 1, (1) Order Bin 5, (1) Order Bin 9
If order #1 and order #5 have quantity (1) of item A, and order #9 has quantity (2) of item A, the pick-to-bin pick list will show the information similar to this:
Item A – QTY 4
(1) Order Bin 1, (1) Order Bin 5, (2) Order Bin 9
The pick-to-bin pick list will do the same type of categorization for as many unique products that are present across the 10 orders.
Here is an example of a pick-to-bin list (5 total bins):

In our example, a person would have a pick-cart with 5 bins, they would collect all the items for all 5 orders using the pick-to-bin pick list – placing them in the corresponding bins. Then after the orders have been 100% picked from physical inventory, they could use the order barcodes on the pick-to-bin pick list to PickingPal-verify the order contents from each bin.
Once each bin has been verified by PickingPal, the bins could be left with the shipping department to ship the 5 orders.
Pick-to-bin can be helpful by minimizing the amount of back and forth a picking staff needs to do within the warehouse. Here is a video from a pick cart manufacturer explaining one example of how picking to cart works.
For more information about this feature, or if you have questions on how it’s used, please contact us.
This feature provides the capability for an order status to be automatically changed from one status to another status upon 100% pick complete.
For example, this feature could be used as follows:
There are many possible uses for the above feature, and the above is simply a theoretical use-case.
Defining Transition Rules
Up to two (2) order status transition rules may be defined.
By default, PickingPal Pro will show one (1) transition rule. If no transition rules have been defined, the ‘From’ and ‘To’ fields will be set to Please Select.

To set the first rule:
To add a 2nd transition rule, click the Add Transition Rule button. Once a 2nd transition rule has been added, the button will disappear.

Using the example above:
To remove the 2nd transition rule, click the trash can button.
To remove the 1st transition rule, simply set From and To to ‘Please Select’ and click Save Changes button.
This feature provides the capability for an order status to be automatically changed by scanning a specific pre-defined barcode.
Up to five (5) rules can be defined.
By default, PickingPal Pro will show one (1) transition rule. If no transition rules have been defined, the ‘Status’ will be set to Please Select.

To set the first rule:
To add rules 2 through 5, click the Add Transition Rule button, then repeat the steps above. Once a 5th transition rule has been added, the button will disappear.
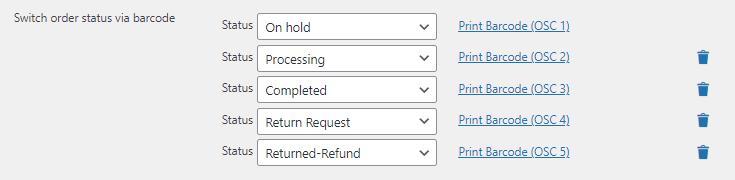
To remove the 2nd through 5th transition rules, click the trash can button.
To remove the 1st transition rule, simply set Status to ‘Please Select’ and click Save Changes button.
See the section below titled Using Switch Order Status via Barcode for usage instructions.
This feature provides the ability to set (restrict) which order statuses are valid for picking.
For example, if a store owner determines that only orders in the Processing order status are eligible for picking, it may be selected in the field provided. If an order in Pending Payment stage is accidentally picked, and scanned, PickingPal will issue both a visual & audible error warning.
This prevents orders in the wrong status from being picked, scanned, and shipped.
Visit Settings > Export
Your product item barcodes can contain as little as your SKU and the SKU’s barcode, or additional information such as Product Name, Price, Color, Size, or any other attribute you feel would be helpful to have printed on the barcode label.
PickingPal helps facilitate the creation of barcode labels by allowing you to easily create a CSV Export file with the raw data needed to generate the barcode labels.
Think of this as a big mail-merge file that you can send to your barcode label provider.
Note: PickingPal displays three (3) system variables SKU, Name, Price by default as well as other system-wide defined Attributes (Products > Attributes).
Use the check boxes in the “Select Export Fields” column to determine what fields you want included in your CSV Export file.
Use the Export Field Order to determine what order you want the fields in. Simply drag the fields to reorder them.
3rd Party Developers: If you’d like to include fields/values from your Extension in the PickingPal Export, we have implemented two (2) filters: wc_pickingpal_custom_fields and wc_pickingpal_custom_field_value. The code is commented with an example in woocommerce-pickingpal.php
The Export section allows you to select the barcode label records you would like to export. Select one, a few, or all of them for export.
The columns and column order are based on the Settings > Export Setup section.
Using the check boxes on the far left, select one or more records for export. You may fill in the QTY values before you Export to CSV, which will include those values in the CSV. Otherwise, you may directly edit your CSV and enter in the barcode quantity values using your favorite text editor or spreadsheet.
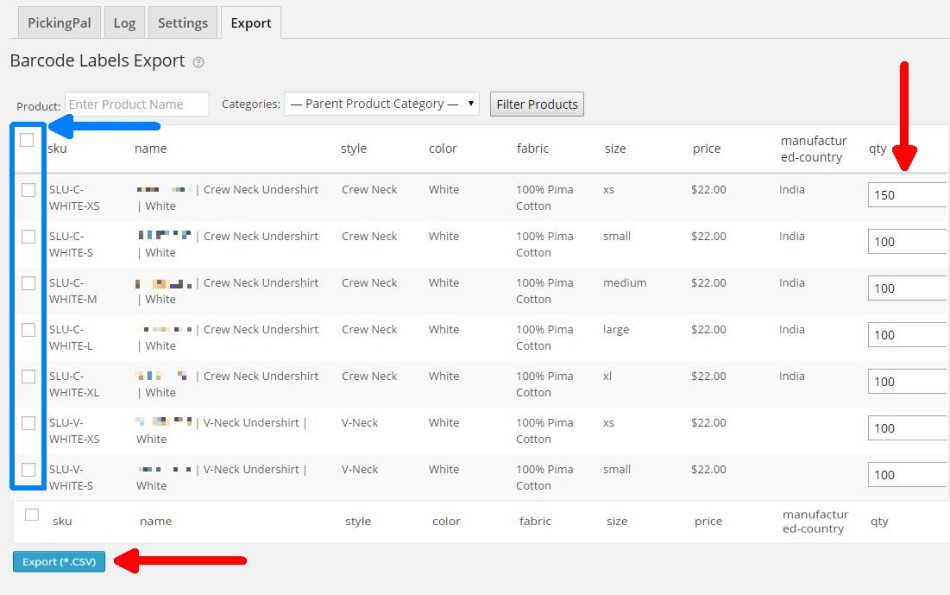
When ready, just click the “Export (*.CSV)” button to download the CSV barcode label file.
Provide your barcode CSV file to your barcode label printing provider.
Here’s an overview of how to use PickingPal.
In WordPress Admin, visit WooCommerce > Orders
Find the Order you would like to ship, and click the “Print Pick Ticket” action button.
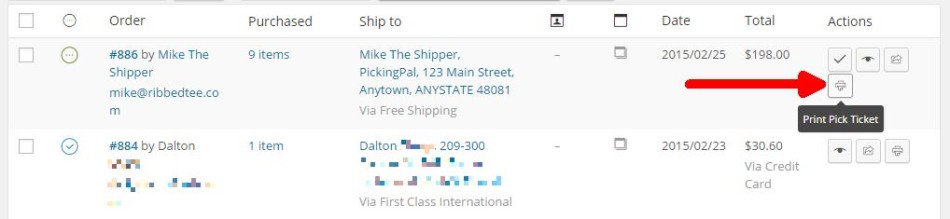
Using the checkbox on the far left, select the Orders you would like to ship, then use the “Print Pick Ticket” option from the Bulk Actions dropdown.

To make locating orders that need picking easier, a “Print Pick Ticket” filter is available in the Orders view.

This view will show only those orders that have not had Pick Tickets printed. Once a Pick Ticket has been printed on an order, it will no longer show up in this filtered view.
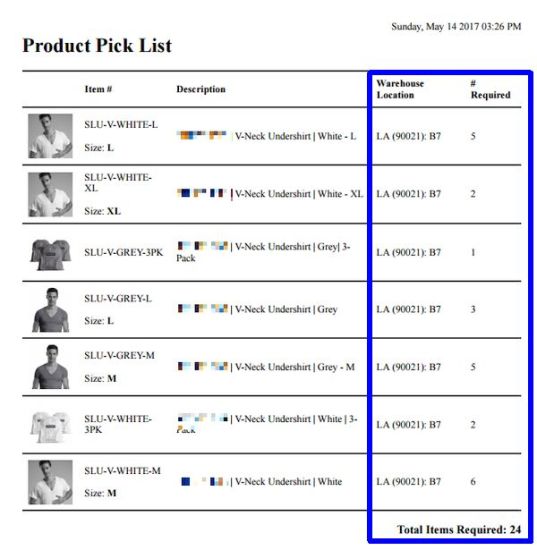
Pick lists are helpful to the picking/shipping team because they help improve picking efficiency.
A pick list is a consolidated view of what inventory items are needed across multiple orders, allowing the picking staff to avoid going back to the same warehouse/bin location multiple times.
For example, if you have 3 orders, each having two quantity units of SKU1 & SKU2, a pick list will show a line of (6) of SKU1 and (6) of SKU2 that are needed for the 3 orders.
Instead of having to manually go through each Pick Ticket to count the total number of items that are needed for a specific item, a PickingPal pick list does that summarizing automatically.

A print dialog window will open, allowing for the printing of the pick list.
PickingPal Pro includes an additional feature that allows for picking individual orders from either the WooCommerce > Orders view or from within the order itself.
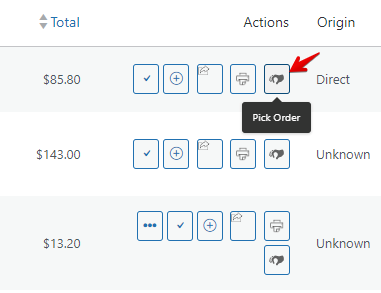
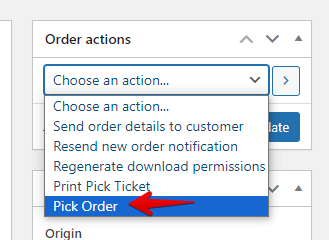
When the Pick Order action is triggered, it will open a new browser tab and automatically load the order into the main PickingPal window.
In addition to the new Pick Order action(s), PickingPal Pro includes the ability for a shop owner to build its own Pick Order links.
Example: https://{url}/wp-admin/admin.php?page=PickingPal&oid={orderid}
The {orderid} value can either be the native WooCommerce post= value or the WooCommerce order number (including support for several custom order number plugins).
In the WordPress Admin, visit WooCommerce > PickingPal

Using your barcode scanner, scan the Order barcode on the PickingPal Pick Ticket.


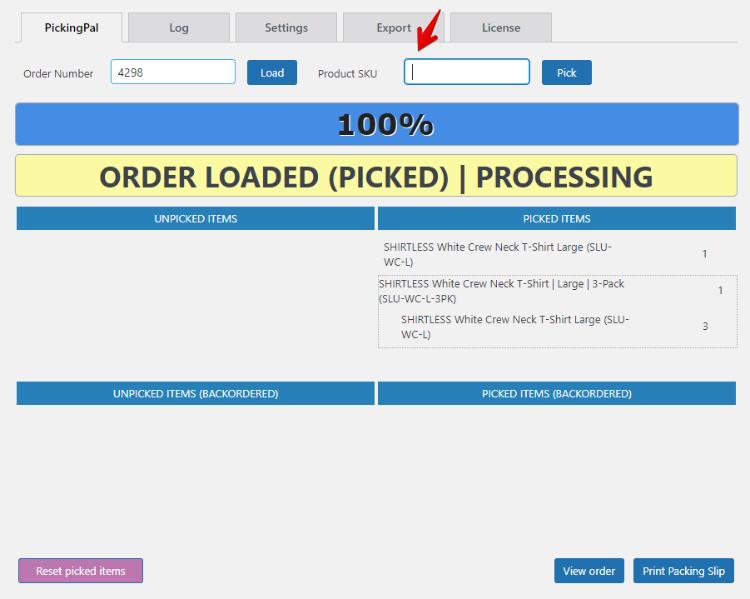
Once the Order is loaded, you’ll see that all the Order line items appear in the “Unpicked items” list, and the cursor has moved to the Product SKU field above.

Now, you’re ready to start scanning barcodes on items themselves.
Grab your first Order item (the physical item you’re shipping) and scan the barcode on that item. In our example, we’ll start by scanning the White, Medium, Crew Neck Undershirt item.

When using a barcode scanner, they are generally configured to automatically add an “Enter” after successfully scanning a barcode. This is equivalent to entering the SKU in the field above, and clicking the Pick button.
During a successful barcode scan, you will see and hear the following visual and audible “OK” notifications.

Repeat the above process for each picked item:
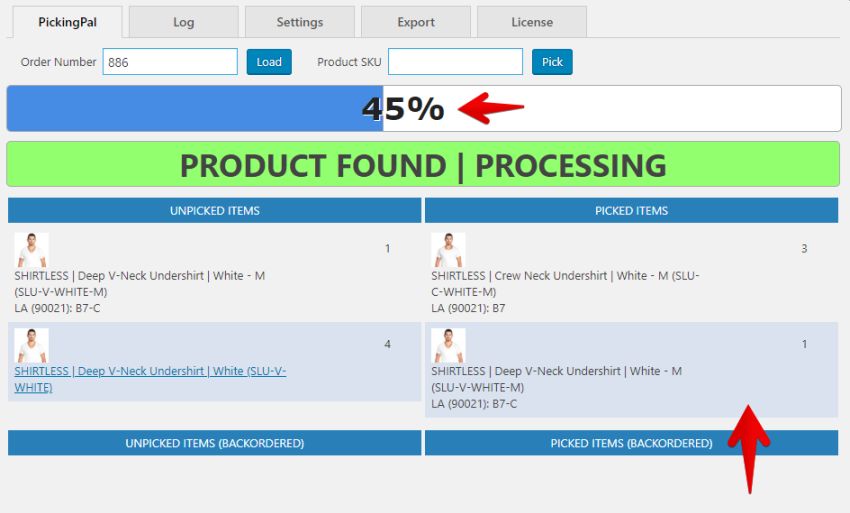
Once picking is complete, PickingPal will show the progress indicator at 100%, play a “pick complete” audible sound, and reset the cursor into the Order Number field to prepare for the next Order barcode scan.

Congratulations! You successfully scanned and verified your first order. Ship with confidence that all items in the order are correct.
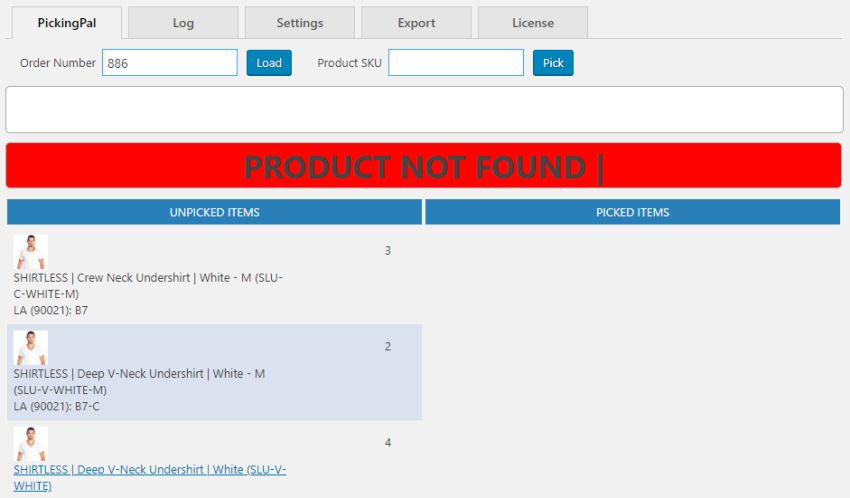
During a scan of an incorrect item, you will see and hear the following visual and audible “NOT FOUND” warning notifications.
A “Packing Slip” may be used to allow shippers to print the items that are being currently shipped.
Pick Tickets are used to pick orders, but there may be occasions where an order cannot be shipped complete. In these cases, a Packing Slip may be printed to show what items are actually being shipped.
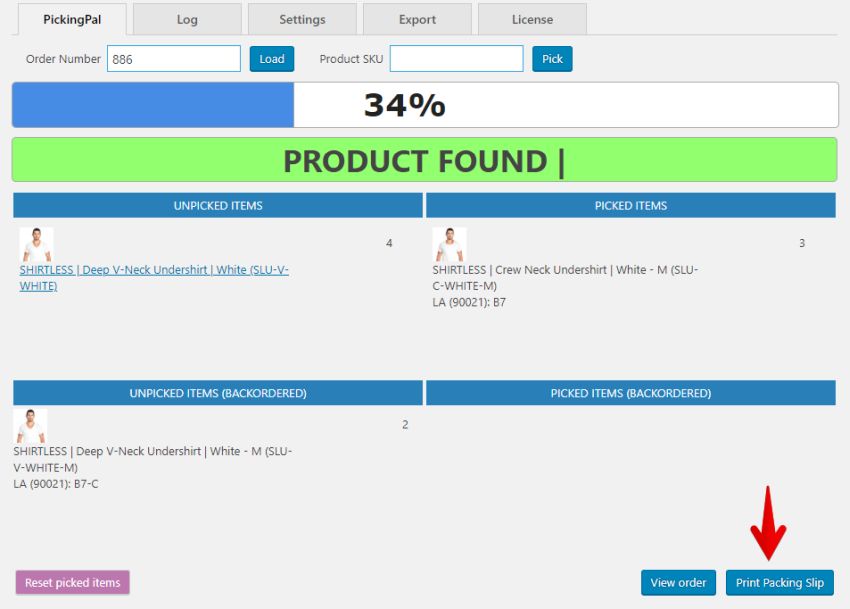
Once the Print Packing Slip button is pressed, a print dialog will appear and show a form similar in appearance to the Pick Ticket.
The Packing Slip will include Quantity Order, Quantity Shipped, Quantity Backordered columns and values.
Visit the PickingPal main tab, load the order. The field focus will automatically move to the Product SKU field.
Scan the Quantity Override barcode, an Override item dialog will appear.
Scan the barcode of the item you want to override the quantity.
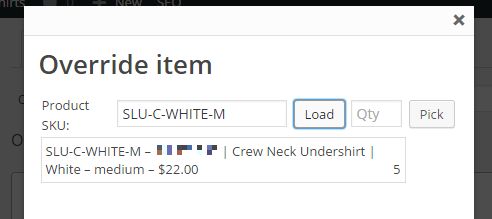
Enter the override quantity amount in the Qty field, then click the Pick button to pick that quantity of the item.
For stores allowing back orders, PickingPal now supports this by separating the pick window into in-stock items (top) and back ordered items (bottom).

In cases of back ordered items, PickingPal will always use a top-down scan order. Meaning it will scan/verify items at the top first, then proceed down the list.
It will not prevent back ordered items from being scanned, but it will allow the shipper to scan the items that are currently in stock, and then come back at a later time to ship the back ordered items once they are in stock.
PickingPal maintains a log of all order & barcode scans. The log view includes 4 columns.

Columns:
PickingPal logs every pick event separately and allows orders to be partially scanned. When an order has been partially scanned, a scan log entry will be created in the Log view.
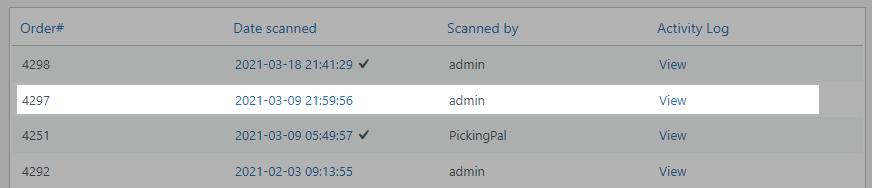
To view more information about the current status of the scan log, in the Date scanned column click on the date/time link and a pop-up box will appear.

The 2nd column (Qty) indicates the line item total quantity, and the 4th column (Picked) indicates the number of items that have been picked for the line item.
Note: To return to the main Log screen, click the Log tab
To search for an Order, enter the Order # in the upper right Search box, or navigate through the Order pages using the Navigation arrows at the top and the bottom of the Scan log table.
In cases where you need to reset the picking status, instead of manually pressing the Reset picked items button, you may use the Pick Reset Override barcode. Note: This feature is primarily used on orders that have either been partially or fully picked.
Visit the PickingPal main tab, load the order. The field focus will automatically move to the Product SKU field.
Scan the Pick Reset Override barcode.

Once the barcode scan has been performed, the Reset picked items button will be activated.

Once the picking reset process is complete, the order line items will appear in the UNPICKED ITEMS window.
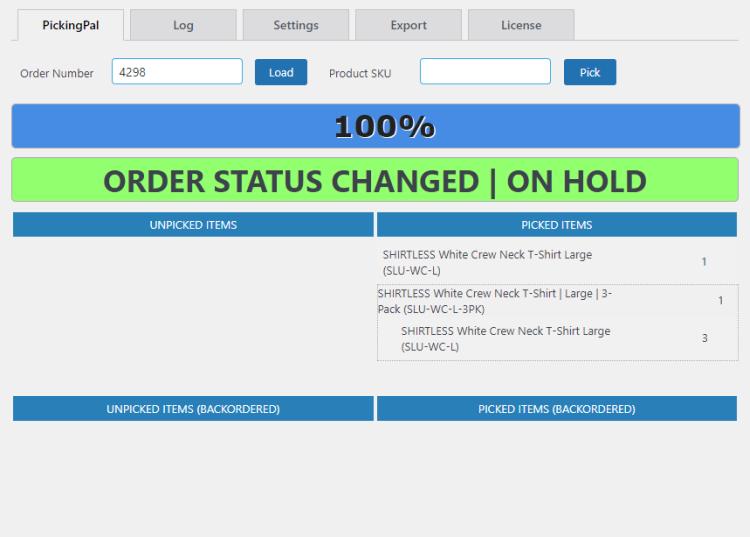
In cases where you would like to change the order status of an order quickly, you may use the Switch Order Status barcode functionality.
Note: Before using this feature, one or more Order Status transition rules need to be defined under the Switch order status via barcode section in Settings > Advanced.
Visit the PickingPal main tab, load the order. The field focus will automatically move to the Product SKU field.
Determine which order status change barcode to use (OSC1 – OSC5), and scan the corresponding barcode. In the example below, we will be scanning OSC1, which will move the order status to On Hold.

After the barcode has been successfully scanned:
To learn more about how to create translation (language) files for your local language, please see our How To Translate & Localize PickingPal article.
See click here to see version updates for PickingPal and PickingPal Pro.